
This chapter contains the following sections:
4.1 Configuration options
4.2 A project example
4.3 The Project Manager dialog
4.4 The project .lpr file
4.5 Types of modules in a project
4.6 More on adding modules to a project
4.7 How files are displayed in the General tab of the Project manager
4.8 Changing the order of files in a project
4.9 Opening a new project
4.10 Opening an existing project
4.11 Compiling a project
4.12 Project before and after functions
4.13 Saving a project
4.14 Running a project
4.15 The main form
4.15.1 Does a project need a main form?
4.15.2 The Project package
4.15.3 The Project name
4.15.4 The Project init function
4.15.5 Running secondary form windows programmatically
4.16 The Project Manager Build tab
4.17 The Project Manager Advanced tab
4.18 Building the application
4.19 Modifying the .lpr file: adding before and after functions
This is chapter 4 of the User Guide for the Allegro CL 6.0 Integrated Development Environment (IDE). The IDE is only supported on Windows machines.
The chapters of the IDE User Guide are:
Chapter 1: Introduction to the IDE
Chapter 2: The Allegro CL Development Environment (IDE)
Chapter 3: An example
Chapter 4: Projects (this chapter)
Chapter 5: Components
Chapter 6: Designing a user interface
Chapter 7: Menus
Chapter 8: Events
See also the essay on projects in doc\cg\project\project.htm.
A project is a collection of modules used to build an application. Allegro CL provides tools for managing projects. In this chapter, we describe how to create and manage projects, how to add modules to the project, and how to convert the project into an application ready for delivery.
In the Allegro CL Development Environment, there can only be one project open at a time, which is the current project. The project window, with the menu bar, displays the name of the current project in its title:
In the illustration, the current project is Project1 (the initial project when Allegro CL first comes up).
As with many things in Allegro CL, behavior dealing with projects is configurable. Bring up the Options dialog by clicking Tools | Options and select the Project tab:
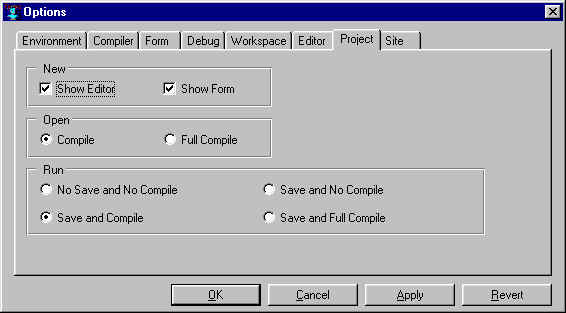
The initial option values are displayed in the illustration. The options are:
New: when a new project is created, an editor workbook is (checked) or is not (unchecked) displayed, a new form and its inspector is (checked) or is not (unchecked) displayed, and the Project Manager dialog is (checked) or is not displayed.
Open: upon opening an existing project, only files that have no compiled counterpart or whose compiled counterpart is out of date are compiled (Compile is chosen, as in the illustration) or all files are compiled (Full Compile is chosen). If No Compile is chosen, no compilation will be done. (That option is useful when compilation causes an error.)
Run: just before running the current project, its files will be saved and/or compiled based on this option's setting. In the illustration, when a form is run, the files will be saved and incrementally compiled.
If Ask Before Auto-Saving is checked, you are prompted before project files are saved.
In this chapter, we describe the default configuration. We usually note where a configuration option may change behavior in the text but if you are seeing behavior different from what is described, check your project options as that may explain the difference.
The tutorial supplied with Allegro CL creates a project called :interface-builder-tutorial (producing the doodler application), which draws cycloidal curves in a window and allows you to set the background and line colors and to modify the curve being drawn. We will use this project as an example. You can bring up that project by clicking on Open Project in the File menu and then opening the file interface-builder-tutorial.lpr in <Allegro directory>\tutorial\final folder.
Information about a project is displayed in the Project Manager dialog, displayed by clicking Project Manager on the View menu. The current project displayed is the :interface-builder-tutorial project associated with the Tutorial.
This dialog lists the form, libraries, other projects and source files associated with the current project. We will describe the things listed below. Most information about a project is displayed in the various tabs of the Project Manager dialog and tools on the dialog allow modifying projects as desired.
Each project has an associated file with extension .lpr. This file is generated automatically when a project is saved. All information displayed visually in the Project Manager dialog is stored in the .lpr file. The file is updated whenever the project is saved. Projects are saved by clicking File | Save All at any time (all files associated with the project are saved, not just the .lpr file). Whenever you run a project or exit Allegro CL, you are prompted to save the project files as well.
Editing the .lpr files directly is discouraged except for several advanced capabilities that cannot be specified from the Project Manager dialog (particularly before and after functions – see 4.12 Project before and after functions below). Except for these advanced capabilities, projects should be managed using the Project Manager dialog.
You can view (and edit, if necessary) the current project .lpr file by clicking on the View Project Source button of the Project Manager toolbar.

In addition to storing information about a project in a file, you can include one project in another (as a sub-project) by including (adding) the sub-project's .lpr file to the modules of the current project.
The modules associated with a project are displayed in the General tab of the Project Manager. Each module is a collection of one or more files. Modules can be added or deleted from a project by clicking on the + button on the Project Manager toolbar (to add) or selecting a file in the project and clicking on the x button (to delete).
The following list shows the types of modules which can be included in a project.
Form module. A form module has two or three files, all with the same name but different extensions. The Project Manager list shows the filename only. Following the filename is information on whether the module is saved and if so, the location of the .cl file relative to the current directory is displayed. The three types of files associated with a form module are:
A source file (.cl). This file has definitions of functions and other objects (classes, parameters, etc.) needed for the form. It is created automatically and can be modified by the editor workbook. The starting code for event handlers is automatically added to the source file of the form module. You can add any other code to the source file that you would like associated with the form. It is very common that you will define the class of the form in its source file.
A builder file (.bil). The bil file is automatically created when you save a form. The bil file contains information about the appearance of the form as well as its components. You must not edit the bil file because your changes could be lost the next time that you save your form. Instead, add your code to the source file. The bil file contains two function definitions based on the name of the form. It does this by defining two functions, one with the same name as the form (if the form is named myform, the function is named myform) and the other with the name of the form prepended with make- (make-myform).
A bitmap (.bml) file. This file is automatically created when you save a form if any of the components in the form have bitmaps. For example, the bitmap providing the picture of a picture button would be included in this file. The bml file contains a description of the bitmaps used in the form (saving you from having to manage the bitmap files).
A project may contain any number of forms. One is identified as the main form as described below.
It is possible to add an existing form module to a project by clicking on + and specifying the form's .cl or .bil file but this is not recommended except for users with .bil files from Allegro CL 3.0.2 for Windows.
To add a new, blank form, click on New Form on the File menu. A blank form named formn, where n is a number that makes the name unique, is created and added to the end of the list of modules in the project.
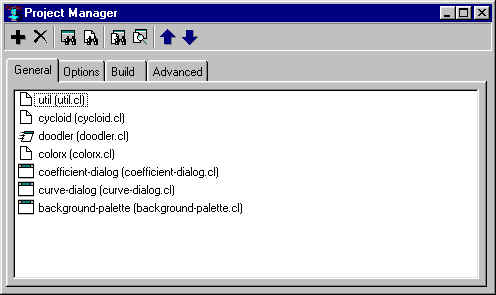
Forms are displayed in the Project manager general tab. Each is listed with an icon shown. The main form first (icon is a speeding window) followed by two source files and then two more forms (and more that are cut out of this illustration):
A list of form and source modules in a project is returned by the modules function.
(modules (current-project))returns a list of the form and source modules in the current project. The functions finder-function and maker-function may be called on a form module to find the names of the auto-generated functions in the .bil file for creating the module's running window.
Other source (.cl) files. These files typically define additional functionality for the application. Add a new source file by clicking on + and specifying the .cl file you want to add. If a source file is already in the editor, it can be added quickly to the current project by right-clicking over its editor pane and selecting Add File to Project from the shortcut menu that is displayed. Note that both forms and source files can be specified with .cl file. The system knows you mean a form if there is a .bil file with the same name and in the same folder. If there is no corresponding .bil file, the system knows you mean a source file. Source files are displayed in the Project manager general tab with an icon of a piece of paper with the upper right corner turned down (see util.cl, the second entry, in the illustration above).
Other project (.lpr) files. The ability to include one project within another allows modularity. Add a subproject by clicking on + and specifying the subproject’s .lpr file.
A list of project modules in a project is returned by the projects function.
(projects (current-project))returns a list of the projects in the current project.
Library files (.dll files). These are foreign libraries that will be loaded into the application. See the description of the foreign function interface in the Programmers Guide for information on using foreign code in an application.
A list of library modules in a project is returned by the libraries function.
(libraries (current-project))returns a list of the libraries in the current project.
Adding a new form. New forms can be added to a project by clicking New Form on the File menu while a project is open. You will be prompted for the type of window associated with the form (that is, the type of window that will be created when the application is run). The usual choice is dialog but see chapter 6 for more information of the type of window to choose. Once the type of window is chosen, a new form is opened and added to the list of modules in the current project.
Adding an existing form. As stated earlier, raw form descriptions in the Allegro CL Integrated Development Environment are stored as .bil files (ie, files whose names have 'bil' extension). A complete form description consists of two or three files with the same name but with extensions .cl, .bil, and (if present) .bml. For example, myform.cl, myform.bil, and perhaps myform.bml. Normally, a user does not directly handle .bil files as they are associated with corresponding .cl files. The main exception is .bil files generated by the Allegro CL 3.0.2 Interface Builder. Such .bil files do not have automatically generated corresponding .cl files.
When adding an existing form to a project, you can click on the + button and specify either the .bil file or, if there is one, the corresponding .cl file.
If a particular form already belongs to a project, we do not recommend adding it directly to a different project. Instead, you can include the project containing the form as a subproject.
Adding a source, library, or subproject file. Clicking on the Add File button (with the +) on the Project Manager toolbar displays an Add to project… dialog allowing you to specify a file to be added to the project. When you have chosen the file, click on the Open button and the file will be added to the Project. The type file is determined by the extension: .dll for a library file, .lpr for a sub-project file, and .cl for source file. (Note that the Files of Type box starts with .cl, .lisp, and .lsp. Change it to All Files to see .dll and .lpr files.)
Both an existing form and an existing source file have extension .cl. The system knows which you intend by looking for a .bil file with the same name in the same folder. If one exists, the system knows you meant to add an existing form. If there is no .bil file with the same name, the system knows you mean a source file.
Where modules are added. Form modules and source modules are processed together as are subproject modules and library modules, so it is only the position of a module with respect to other modules processed with it that is important. However, the ordering of modules that are processed together can make a difference. In general, you want definitions (of functions, macros, variables, etc.) to precede use. You can change the order by selecting a module and clicking on the up or down arrows, which will move the module up or down within the list of modules.
The illustration shows the General Tab of a Project Manager listing a number of modules. We have added a library (dll file) and a subproject (lpr file) to the :interface-builder-tutorial project for this illustration only:

The project has a single library called linkacl.dll and a single sub-project called dm1 along with the forms of the interface-builder-tutorial project.
Location of files: all modules are given paths relative to the project file if they are in the same folder or subfolders of the project file. All the forms and source files are in the same folder as the project file. The library and the subproject are specified with absolute paths because they are not located in the project folder or one of its sub-folders.
The order in which modules are listed: libraries (.dll files on Windows), sub-projects (.lpr files) and other files (source files and forms) are treated separately, so order within those types of modules is what is important. All library modules are loaded first, and all sub-project modules next, both in a depth-first order. Then all source and form modules are loaded in the order that they are specified. In this example, the load order is:
lnkacl dm1 doodler util cycloid curve-dialog coefficient-dialog colorx background-palette
Compilation of form and source files follows the same order as loading, with each compiled file being loaded before the next is compiled.
As said just above, library (.dll) modules, sub-project (.lpr) modules, and source and form modules (.cl) are all handled separately, so order only matters within those file types. Files can be reordered (among other modules processed together) by selecting a module (so it is highlighted) and moving it up or down with the up- and down-arrow buttons on the tool bar.
Choose New Project from the File menu. The current project will be closed (only one project can be worked on at a time) – you will be prompted to save files associated with the project being closed if necessary. The new project will be created with a single blank form.
Choose Open Project from the File menu. The open dialog will appear. Specify the .lpr file associated with the desired project.
If you click Tools | Compile Project, all source files (.cl and .bil) that have been modified since the last compile are compiled and loaded and the project file is compiled and loaded.
If you click Tools | Full Compile, all source files and the project file are compiled and loaded (each file is loaded after it is compiled and before the next file is compiled).
Incremental compilation (with Tools | Compile Project) is usually satisfactory when working on a project and is faster because only a few files (typically) need be compiled. Full compilation is necessary when changes to one file result in changes to another file even though that file is not modified. For example, suppose in the project illustrated above, a macro is defined in utils.cl which is used in doodler. If you change the macro definition in utils, doodler should be recompiled even though it has not been touched because uses of the macro in doodler must be re-expanded. (Recompilation is not necessary when a function defined in util.cl and used in a later file or form is redefined since changes in function definitions are automatically tracked even in compiled code.)
Compilation of a source (.cl) file results in a .fasl file, of the same name.
Whenever a project is compiled, before functions are called before the compilation and after functions are called after.
Before and after functions are zero-argument functions which are called before any loading within the project (before functions) and after all loading is complete (after functions). When you compile a project, all files are loaded even if they are not compiled. Before and after functions are not specified on the Project Manager dialog so they have to be specified by editing the project .lpr file (one of the cases where editing a .lpr file is necessary). Before and after functions are useful, for example, for modifying the environment appropriately for the compilation (before functions) and restoring the environment after the compilation. See below for more information on before and after functions and details on how to specify them in a Project .lpr file.
All modified and unsaved files associated with a project are saved when Save All is chosen from the File menu.
Note that certain other actions, such as opening a new project or exiting Allegro CL, causes you to be prompted to save all files associated with the current project.
Click on Run | Run Project. The Init Function of the project will be run in a separate thread. The default Init Function creates and displays the window associated with the main form and the function returns the window object (a stream). If you have not arranged to display other windows in the project programmatically, you can run forms other than the main form by selecting the form of interest and clicking Run | Run Form. Clicking Run | Stop hides the running window and displays the form. Running a project executes the initialization function of the project.
As we said above, by default, the initialization function of a project calls the maker-function for the project’s main form which creates and displays the window associated with the main form only. Any other windows (associated with forms other than the main form) are not displayed by default and must be displayed programmatically. How they are displayed is part of your application. Looking at the interface-builder-tutorial (doodler) project, for example, there are several windows some of which are displayed along with the main form window and others are displayed by user action.
One form associated with a project is identified as the main form. The main form is defined by the property that (assuming the default project init function is used) the window associated with it is the primary window of the application. That means that closing it (when the application associated with the project is run) exits the application. You can have many other windows in your application but only one primary window. Usually, the primary window is the first window displayed when your application is run and it is the only one displayed by default.
If there are many forms associated with a project, one must be identified as the main form.
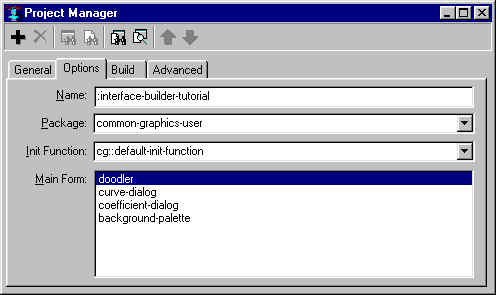
The forms associated with a project are listed on the Options tab of the Project Manager dialog. In the illustration, the four forms associated with the project are listed. The selected form (in this case doodler) is the main form. This can be changed by simply selecting another form on the list.
A project can have no associated forms. The application built with the project will thus have no windows. Also, projects designed to be sub-projects of other projects may have no need of windows. For window-less projects, you must specify an initialization function. The initialization function can do whatever you want including writing to files, monitoring sockets, etc. The initialization function is specified in the Init Function box on the Options pane of the Project Manager and may be retrieved or set programmatically with on-initialization and its setf.
A project has a project package associated with it. This package is specified on the Options tab of the Project Manager dialog, in the Package field. The value should be a symbol naming a package. The package of a project specifies the default package for all forms in the project. Individually you can specify the package of any form but the initial package of a form is determined by the package of the project. When a form is added to a project, the source file of a form has an in-package statement added.
Projects are named with symbols. The symbol naming a project is specified in the Name field of the Options tab of the Project Manager. We recommend using a keyword for names, as we have done. The name can be used with find-project to programmatically find the project with the specified name.
The init function is called (with no arguments) when the project is run. It is also run when the application associated with the project is started. The initialization code looks like this, in part:
(let (main-window (<project-init-function>))
    (loop
      (if (not (open-stream-p main-window)) (exit)
        (process-single-event)))
(We are showing the structure of the code, not the actual code.) We note from this code-like fragment:
If closing the main window is not an adequate technique for exiting an application, an alternative is to place the event-handling loop shown above directly in your own on-initialization function, and exit the event-handling loop when the application should exit. If you do that, make sure that the init function does not return a window.
When you use the Run | Run Project command or start up a standalone application that was generated from a project, a window is created from the main form of the project automatically; you do not need to write any code to do this. But typically an application's main window will invoke other windows when the user clicks on certain widgets or otherwise requests particular windows to be shown.
If these windows were designed interactively as forms, then the application needs to know how to create these windows programmatically, such as in an on-change event handler function of a button widget.
The best way to create a window from a form programmatically is to call the finder-function or maker-function for the form. These functions are generated automatically whenever you save a form, and their names follow a simple rule so that you can know what function to call to create a window from the form.
Specifically, the finder-function name will be a symbol having the same name as the
form, and the maker-function's name will be a symbol whose name consists of the string
"make-" followed by the name of the form. So if the name of the form is :form2,
then the finder-function will be form2 and the maker-function will be make-form2.
Both symbols will be in the form's package, as set via the package-name property of the
form in the inspector. If you later change the name property (or the
package-name property) of the form and save the form again, then the generated functions
will have corresponding new names as well.
Here is an example of an on-change event-handler
for a button widget that would create a second window from a form named form2,
making it owned by the first window so that it will shrink and close along with the first
window:
(defun form1-button1-on-change
    (button new-value old-value)
  (declare (ignore new-value old-value))
  (select-window
   (make-form2 :owner (parent button)
               :title "This is Form 2"))
  t)
The finder-function returns a window that has already been created from the form if one exists, otherwise creating and returning one, while the maker-function always creates a new window and returns it. The finder-function takes no arguments, and always creates the window (when it does create one) as a non-owned top-level window with the properties that were specified at design time. The maker-function, on the other hand, has a number of keyword arguments that allow creation of the window as an owned or child window of any other window and with a custom position, size, name, title, and/or border. The names of the maker-function's keyword arguments are owner, child-p, exterior, name, title, and border, and have the same meanings as with the function make-window.
Since the names of the finder-function and maker-function are predictable, there is typically no need to look at the actual generated source code for them. But if you do wish to view it, it can be found in a source code file with the extension .bil at the path where you specified to save the form. For example, if you save a form to the file second-form.cl, then the file second-form.bil is created containing the auto-generated finder-function and maker-function for the form.
While it is possible to edit a .bil source code file directly, it is so dangerous that it is better never to do so. It is dangerous to do so because if you later save the form itself then your edited code will be overwritten by newly auto-generated code. Note that in addition to saving a form explicitly by invoking the File | Save command on it, the form could easily be saved inadvertantly if you have interactively made any changes to it (even by accidentally moving it a bit) if you sometime later use the File | Save All command in any window or if you say OK when a dialog asks if you want to save various current modifications. A warning dialog will appear for these reasons if you do in fact attempt to save a .bil file in the editor.
See also the help pages for finder-function and maker-function, which return the names of the generated functions programmatically.

This tab of the Project manager allows specifying options for building the application associated with the project. The first check box allows you to specify whether debugging information is printed to a window during the build. You can associate other auxiliary files with your project in the next set of controls. The auxiliary files are a help file (not supported in release 6.0), a splash bitmap (displayed as your application starts up) and an icon file (used as the icon for the application by Windows). By default, your application will not have a splash screen unless you specify a bitmap. The Allegro CL Head of Franz Liszt icon is used as the icon if no icon file is specified.
Additional choices allow displaying the icon in the system tray (when the application
is running) allowing access to the Console and a way to interrupt the application; full
recompilation when building the project distribution with the :runtime
feature; and specification of the runtime type (standard – no compiler, dynamic
– with compiler, partners – custom license). Note you may only choose the
runtime options you are licensed to use (see doc/runtime.htm).

The advanced tab allows further specification of options when building the application associated with the project. You can add and remove Allegro CL build modules. You can have these modules included or left out of the build by selecting or deselecting (so it is unhighlighted) modules. If a build module is not selected, its functionality will not be available in the application. If the functionality is truly unused, leaving it out is desirable since the resulting application will be smaller. But, if the module is in fact needed, the application may fail when the application executes and needs to use the needed but missing functionality (an error in the Console window may indicate this problem). There are various modules left out by default (none are illustrated). Simply click on a module to toggle its inclusion or exclusion.
The six other controls affect other aspects of the application.
For US Government: if checked, an addition to the standard copyright notice is added which, complying with US regulations of software used by the US Government, indicates (as a simple copyright notice does not) that the US Government does not have free use of the software. Adding to the copyright notice is the only effect of checking this box.
Presto Mode. If checked, code will be libfasl loaded (see loading.htm), meaning that certain information about functions will be left in a file on disk until the function is actually called. The result is a smaller (initially at least) image at the cost of slightly slower performance when a function is first called and slightly more complication in managing application files.
Purify: various constants (code vectors, strings, and others) will be placed in a .pll file included with the distribution.
Include Runtime Bundle: a bundle file appropriate for the application (and containing only thins allowable in runtime) will be included in the distribution. This allows for a smaller image size and code which may not be needed is not included in the image but is available for loading.
Old and New Space. The size (in bytes) of the initial old and new spaces in the application. See gc.htm for definitions of old and new spaces. The default values are typically adequate, at least early in development.
See building-images.htm and delivery.htm for more information about these values (the oldspace, newspace, runtime-bundle, purify, us-government and presto keyword arguments to build-lisp-image).
Two choices on the File menu, Build Project exe and Build Project Distribution, build your application.
Build Project exe is for simple testing. It builds your application in the project folder (where the .lpr file resides), resulting in a .exe file named <projectname>.exe (where <projectname> is the name specified on the Options tab). After using this command, you may need to copy DLL files from the Allegro Directory to the test directory to allow the standalone to run. (On the same machine, some of the DLL files may be in system-visible locations so copying may not be required.)
Build Project Distribution prompts you for a folder (which must not already exist) and copies all necessary files to that folder, including the application .exe file. The contents of this folder can be sent to users of your application (note: you are distributing copyrighted Allegro CL material along with your own files so you must be licensed to distribute).
Before and after functions are functions with zero arguments called before a project is compiled (before functions) and after compilation is complete (after functions). They must be specified using arguments to define-project. The project .lpr file contains the define-project expression which defines the project. If you want before functions, add
:before-functions (list '<function name>
                        '<function name> …)
to the arguments of define-project. If you want after functions, add
:after-functions (list '<function name>
                       '<function name> …)
For example, here is the define-project expression for project1 with foo and bar specified as before functions and baz as an after function.
(define-project :name :project1
     :modules (list (make-instance 'form-module
                      :name "form1"
                      :function-name 'form1
                      :create-on-open nil)
                    (make-instance 'module :name "excode"))
                                   :projects nil
                                   :libraries nil
                                   :package-name :common-lisp-user
                                   :main-form 'form1
     ;; stuff deleted
     :old-space-size 256000
     :new-space-size 6144
     :before-functions (list 'foo 'bar)
     :after-functions (list 'baz))
Go to chapter 5. Go to the beginning of this chapter.
Copyright (c) 1998-2000 by Franz Inc. All rights reserved.
