Using Forms to Create an Application
$Revision: 1.1.1.1.8.3 $
Process
Designing Your Application
New Form
Components with Properties and Events
Inspector
Expanding the Inspector's
Value Fields: Extended Editor Controls and Behaviors
defcomponent Macro
Attachments
Options
Running forms programatically
Process
While working in Allegro CL, you can be in two modes of operation, design-time
and run-time.
- During design time, you can design your windows and dialog boxes, write code, etc.
Design time issues are covered here.
- During run-time, you are running your application within the Development Environment.
This allows you to preview the behavior of your application and still have all the
debugging and development tools at your command.
Designing your Application
User interface design is an important part of building your applications. In Allegro
CL, forms permit you to visually design the windows and dialog boxes for each application.
At run-time, your forms are used to create the windows of that application.
| As much as possible, forms provide a virtual rendition of a
running window. You can place controls inside of forms. A control lets you interact with
an application. (We have named these controls "widgets" in certain cases in the
past, and are slowly renaming them.)
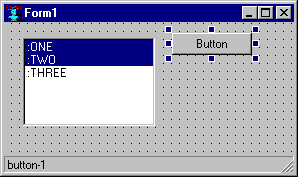
Examples of controls are buttons, static-text, and list-boxes. The illustration shows a
form with a multi-item-list
control and a button control.
The form also has a status bar at the bottom. |
|
During design-time, visible controls look and behave as "live" as possible,
but they are not active. Thus, you can switch tabs in the tab control in design-time by
clicking them, but none of your code is executed when you click on a button. You must run
the form to see that behavior.
When you are designing a form, you are specifying its initial state during run-time.
Your code can change anything about the window or dialog box at run-time.
New Form
To create a new form, use the File | New Form command. You are shown a
list and prompted to select the type of window that will result. Your selection becomes
the class of the new form (the slot is named class but is accessed by
the device accessor). Each of the options listed in the New Form dialog is a window class.
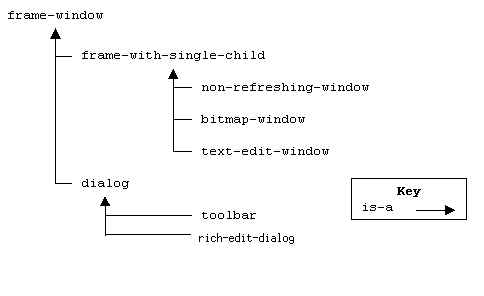
| Synopsis of Classes Used to
Create Windows in Your Applications |
| frame-window |
The simplest window. This class provides a window with
options for borders, title bars, etc. By default, the frame-window does not have
any sub-windows. In the IDE, the window with the menu-bar is a sub-type of frame-window. |
| non-refreshing-window |
A sub-class of frame-with-single-child,
this window is slightly more sophisticated then frame-windows. The non-refreshing-window
automatically creates a pane window that is sized to its interior. You are responsible for
drawing to the pane whenever updates are required. |
| bitmap-window |
A sub-class of frame-with-single-child,
this window has a pane window automatically created for its interior. The pane window
keeps a backing store so that it is quickly and automatically refreshed whenever required.
The doodler window used in the tutorial
is a subclass of bitmap-window.
That way, the graphics are redisplayed without having to re-compute the curve(s) every
time.
The down side to bitmap-window
is that it is very expensive in terms of memory usage. |
| text-edit-window |
A sub-class of frame-with-single-child,
the pane of the text-edit-window
supports multi-line text input. |
| dialog |
A subclass of frame-window. Dialogs let
you add components to a window. The dialog class adds support for
tabbing, alt-keys, etc so that components work in a Windows-standard manner. Dialogs are
the most common choice when creating a window because many windows require the addition of
components. You must use dialog
or one of its subclasses if you want to create a modal dialog. |
| rich-edit-dialog |
A subclass of dialog intended for use with
rich-edit controls. Currently the only functional differences between a dialog and a
rich-edit-dialog are: (1) Creating a rich-edit-dialog form will automatically place the
usual set of rich-edit controls and menu-bar onto the form; and (2) Making a close gesture
on a rich-edit-dialog will prompt the end user to save any unsaved files in any rich-edit
controls on the dialog, and avoid closing if the user does not confirm the close. |
| toolbar |
A subclass of dialog. Therefore, you can add a
toolbar to any window (frame-window,
non-refreshing-window,
etc) and add components to the toolbar. Currently, the New Form dialog does not display
toolbar as an option. You can add a toolbar to any of the window types by toggling their
toolbar properties. |
| The New Form dialog (displayed
when you click Files | New
Form) displays all subclasses of these six described classes. If you have already done
the Tutorial, you have seen this demonstrated: opening the final state of the tutorial
adds several window classes related to the tutorial because several subclasses were
created during the exercise. We recommend that you always subclass one of the
previous 5 window classes for your windows. That way, you can customize event handling
behavior without affecting the behavior of the IDE or other windows in your application. |
Components with Properties and
Events
Both forms and controls are components, but the definition of components is much
broader. A component can be any instance (in the object-oriented sense) that has
properties and events. Therefore, a grid-row-section
is a component even though it does not have a window handle or any display of its own.
Properties are "active" attributes of an object. You can read and set the value
of properties. Properties are considered active because changing the value verifies that
the new value is correct and updates all dependent values and the display of the object
automatically. Using the title property of a window as an example, setting the title
causes the title of the window to change immediately.
An event handler is a special kind of property. Event handlers are triggered in
response to the user doing something in the running application. For example, clicking on
a button triggers the on-change
event handler. During design-time, you can write code for the event handler but the code
does not execute until run-time. Currently, only controls have event handlers. Forms
themselves do not have event handlers.
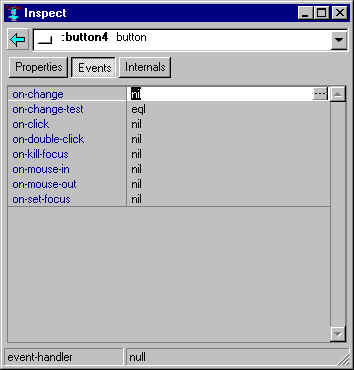
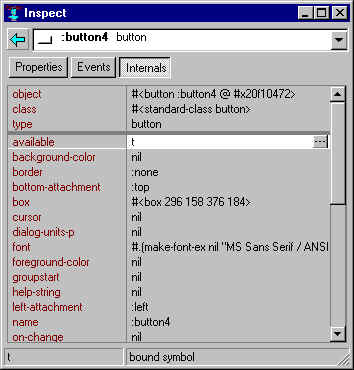
Inspector
During design time, you can work with forms and events using the inspector. In the
following figure, the properties of a button are being inspected. You could switch to the
events or internals tab and different information would be displayed. The left side of the
grid is the name of the property. If you click on the name of the property, then you can
inspect the value of the property. For example, you could click on the siblings property and
inspect the list of controls on the form.
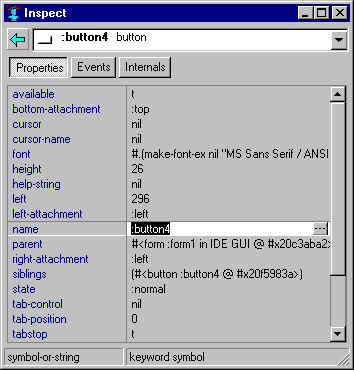
|
The right side of the grid contains the values
of the properties. Remember that the values of the properties are their initial values
during run-time. Your code can change the values of properties at run-time but this does
not affect the value of the properties in the form. When you focus on a property, you
can enter a new value directly in the text box. The value that you enter is taken as
literal and not evaluated.
An alternate way to change the value is to click on the small button on the rightmost
edge. This is the extended editor button and behaves differently depending on the type of
property. A shortcut for invoking the extended editor is to double click on the value of
the property. |
Expanding the Inspector's Value
Fields: Extended Editor Controls and Behaviors
- Toggle - toggles between t and nil. Graphic is a check mark..
- Font - displays the font dialog. Graphic is an "f".
- Color - displays the color dialog. Graphic is a rainbow.
- Menu - displays the menu editor. Graphics is an ellipsis.
- Multiple Choice - display a drop-down list of choices. Graphic is the down arrow like a
dropping combo box.
- Path -displays the standard file dialog. Graphic is a yellow file folder.
- Function - display the integrated editor. Graphic is the ellipsis.
If function does not exist, creates skeleton code. Otherwise, the existing function is
displayed.
- General - displays the extended editor. Graphic is the ellipsis.
| For most cases, the extended editor is displayed when you
click on the value field. The figure shows the extended editor for the range of a single-item-list. The
initial expression in the extended editor is generated based on the value of the property.
For some cases, Allegro CL cannot generate a valid initial expression and a warning will
be displayed. |
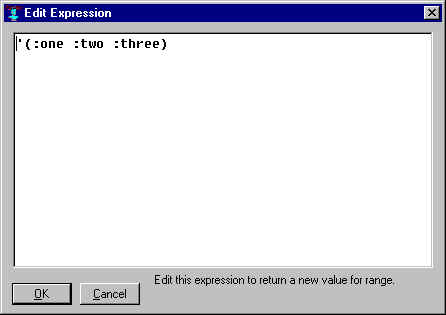 |
| When you click on OK, the expression is
evaluated and the resulting value becomes the value of the property. Therefore, the
extended editor is similar to working in the Debug Window where each expression is
evaluated and the results are returned. The extended editor is literally an editor and all
your key bindings will work. |
Some properties are read-only
such as the form of the button. You can focus on read-only properties but you cannot
type in a new value. You can also display the extended editor for read-only properties but you cannot
modify the resulting expression.
| The Events tab of the inspector works slightly differently
because the value of a property is a function. For event handlers, the extended editor
button displays the integrated editor with the definition for the function. If the
function does not exist or is a "standard" function, then skeleton code for the
function is generated.
Standard functions are true and false and the assumption is that you will want to
create your own event handler function. If the function already exists, then the editor
with the function is displayed.
When creating a new event handler function, the name is created by concatenating the
name of the form with the name of the control and interning it into the package of the
form. Different event handlers take different argument sets. For example, on-change event handlers
take the control, new-value and old-value. The on-double-click
event handler takes the window and control. Skeleton code for the event handler will
differ based on the type of the component and the event-handler. |
 |
| With the internals tab of the inspector, you can change
values in the internals. This is neither recommended by Franz nor guaranteed to work. |
 |
defcomponent
You can specify your own components programmatically using the defcomponent macro.
The defcomponent
macro takes the same arguments as the defclass macro with the addition of
the property class option. Here is a simple example of the component for cached-pixmaps.
(defcomponent pixmap ()
  ((name
     :accessor name
     :initarg :name)
   (texture
    :initform nil
     :accessor texture
     :initarg :texture)
   (texture-info
    :initform (default-texture-info *system*)
     :accessor texture-info
     :initarg :texture-info)
   (mask
     :accessor mask
     :initform nil
     :initarg :mask)
   (pixmap-handle
     :initform nil
     :accessor pixmap-handle
     :initarg :pixmap-handle)
   ) ;; end of slots
  (:default-initargs
    :name (gensym-sequential-name :pixmap nil)
    :contents nil
    :allow-other-keys t)
  (:properties
   (name
     :type string
     :editor-mode :long-expression)
   (texture
     :type texture
     :editor-mode :long-expression)
   (mask
     :type texture
     :editor-mode :long-expression)
   (texture-info
     :type texture-info
     :editor-mode :long-expression)
   (pixmap-handle
     :type pixmap-handle
     :editor-mode :short-expression
     :read-only t)
    (palette-size
      :type palette-size
      :read-only t)
    (width
      :type positive-integer
      :read-only t)
    (height
      :type positive-integer
      :read-only t)) ;; end of properties
  (:finalize t))
Each property is defined as follows:
- name - name of the property.
- reader/writer/accessor -
function names to read and write the property.
For CG, the readers and writers (if they exist) are the same as the name of the property
by default. That way, you know the names of the functions to read and write properties by
inspecting the object.
- type - is the type of value
of the property.
When setting a property in the inspector, there is a typep check to verify that the
property is valid.
- initarg - name of the
initarg for the component when creating an instance of it.
Initargs are used by the builder when generating a bil file. By default, the name of the
property is turned into a keyword.
- help-string - string
displayed in the status bar of the inspector when focusing is placed on the property.
- remake - used by the builder
and will not be documented for external use.
- editor-mode - one of :toggle, :multiple-choice, :path, etc mentioned previously.
- read-only - Boolean value on
whether the property can be set or not.
- choices - valid only when
the editor mode is multiple-choice or toggle.
Enumerates the possible values.
- hidden - Boolean value on
whether the property is displayed in the inspector or not.
Attachments
Specify attachments to control the position of the sub-windows and controls (scrollbar,
etc) in a window. All components have left, top, right, and bottom attachments properties
that can be specified in the inspector. The values of the attachment properties determine
how the component will reposition and resize when its parent window resizes.
Using the top-attachment property as an example, it determines the behavior of the top
edge of the scrollbar. Possible values are :top, :bottom, and scale.
If the value is :top, then the top edge of the scrollbar maintains the same
distance from its parent's top as before the parent was resized -- if the distance was 30
pixels before it is 30 pixels after the parent's resizing. If the value of top-attachment
is :bottom, then the top of the scrollbar keeps the distance to the bottom of
its parent window constant. If the value of top-attachment is :scale, then
the ratio of the distances from the top and bottom sides are constant -- if the top edge
of the scrollbar is half way between its parent's top and bottom edges. Then, the top edit
of the scrollbar is halfway between after resizing the parent.
Options
| You can change the design-time behavior of forms using the
Form tab of the Options dialog. The Construction group of check boxes enables you to
specify the display and granularity of the form's grid. |
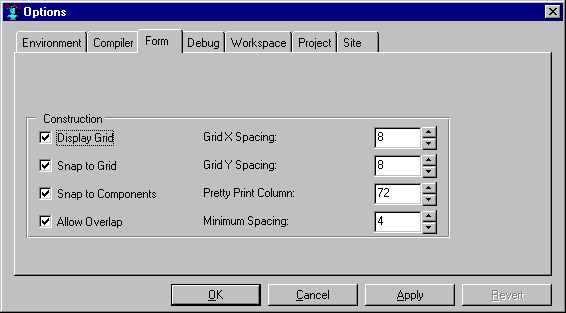 |
| The Snap to check boxes determine how objects
will align with respect to each other and the grid. Minimum spacing is not used unless
Allow Overlap is unchecked. If overlaps are not allowed, then the minimum spacing is the
distance that objects are offset from each other when they overlap. |
Running Forms Programmatically
If your project contains only a single main form, and it is sufficient for its running
window to always be created in its default state and location on the screen, then you may
never need to create the running window of a form programmatically. In the IDE, you can
simply do a Run Form or Run Project (both on the Run menu), and in the
generated standalone application the window will be created automatically whenever the
standalone executable is started up (assuming that the project uses the default on-initialization
function).
Otherwise you will need to programmatically create windows that you have designed using
forms. This is typically needed when the end user makes a gesture on the main application
window that requires a second window to appear. You have designed this second window as an
independent form, and the application now needs to programmatically create it, perhaps at
a certain position relative to the main window or as a child window of it.
The second window can be created programmatically by calling one of two functions that
are automatically generated whenever the form for the window is saved in the IDE. For
example, let's say you have created a form that is initially named :form1, and you have renamed it to :address-window
(see the name property when
inspecting the form) and then saved the form, specifying the filename addwin.cl when
prompted. addwin.cl will be a nearly empty file (it contains only some comments
and an in-package form) where you can place event-handling code for the
controls on the form, but a second source code file called addwin.bil will also
be created. This file contains automatically generated source code for creating the
running window at any time later. The Run | Run Form
command runs this code, but an application can also call these code whenever it decides to
create the window. (You should not modify the code in this file, since your modifications
would be overwritten by newly-generated code the next you save the form.) If you open this
.bil file in the editor, you will see something like this:
(in-package :common-graphics-user)
;; Return the window, creating it the first time or when it's closed.
;; Use only this function if you need only one instance.
(defun address-window ()
   (find-or-make-application-window :address-window 'make-address-window))
;; Create an instance of the window.
;; Use this if you need more than one instance.
(defun make-address-window (&key (parent (development-main-window *system*))
   (exterior (make-box 256 181 972 551))
   (name :address-window)
   (title "Form1")
   form-p) ...
   [lots of code here to create a window and its controls])
The first function has the same name as the form itself, and the symbol naming it is in
the package of the project at the time that the form was first saved. This function is
known as the finder-function of the form module. The second function has the same
name except with make- added at the front, and is known as the maker-function.
Either of these functons may be used by the application to create the window whenever
desired. The first function simply finds and returns the window if it has already been
created, or else creates it and returns it. It is the simplest to use, and may suffice if
only one copy of the window is needed, and it should be a top-level window, and can always
be at its default location. Otherwise the second more general function should be called.
It allows creating multiple copies of the window, with each one being a child of any
parent window, at any location relative to its parent, and with a custom name and title
for each instance. (If further customization is needed at runtime, this code could be
modified arbitrarily, but the form should no longer be modified interactively.)
The default parent argument, (development-main-window
*system*), is the invisible IDE owner window when you are in the IDE, but is simply
the screen in a standalone executable. So when a parent is not specified, a form's running
window will be "in the IDE" when the IDE is running but will be a non-owned
top-level window in a standalone executable.
You should not pass the form-p argument when calling the maker-function. It is
for internal use by the IDE only.
After making a window by calling one of these functions, select-window is
typically called to expose the window and give it the keyboard focus.
Copyright (C) 1998-2000, Franz Inc., Berkeley, CA. All Rights Reserved.