The menu editor allows you to design menus for Window menu bars. It does not support designing of pop-up menus.
This is a modal dialog. You must click on OK or Cancel (or click on the close box, equivalent to Cancel) before doing anything else in the IDE.
This dialog is displayed in two ways.
1. From the Inspector window inspecting a form. Click on the extended editor button in the menu field when a form is inspected.
2. Using the Edit Menu Bar menu command on the Form menu. This command will only be present when the current form already has a menu bar. If the current form does not have a menu bar, Add Menu Bar will be on the Form menu. Choose that to add a menu bar and then choose Form | Edit Menu Bar to display the Menu Editor dialog.
Menu bars can be removed from a form by making the value of the menu property nil (using the Inspector) or by choosing Form | Remove Menu Bar.
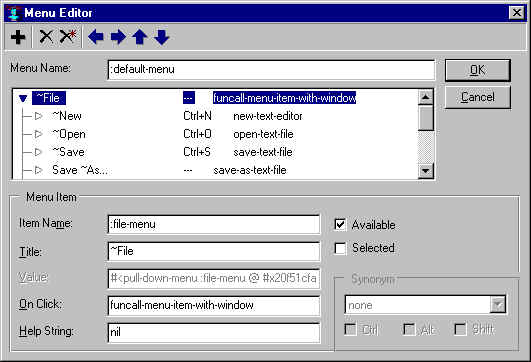
Menus are displayed using an outline control. The first level (all the way to the left) identifies menus on the menu bar. An item in an indented level is either a menu-item (if it is a leaf in the outline) or a submenu (if the item itself has subitems).
The toolbar
The toolbar has seven buttons.
The PLUS button: clicking this adds a new item to the menu, just below the selected item.
The X button: deletes the selected item of the menu. All subitems of the deleted item will also be removed.
The X* button: delete all items. This results in the null menubar which does not display on the window. This is roughly equivalent to changing the menu property of the form to nil.
The left arrow button: unindent by one level (if possible) the current item.
The right arrow button: indent by one level (if possible) the current item.
The up arrow button: move the current item above the item at the same level above it. A subitem cannot be moved above the item it is indented from. Thus, this button will not move a subitem of one item to become a subitem of a different item.
The down arrow button: move the current item below the next item at the same level.
The name field
Displays the symbol naming the menu. We recommend that menus (and other objects) be named by unique keywords. The name can be used by functions such as find-named-object to get a programmatic handle on an object.
The menu hierarchy field
Displays the menubar structure as an outline. Items wholly to the left name menus on the menubar. The contents of a menu on the menubar are the items indented one level in below a menu. Any item that has further indented items below it names submenus. The outline can be manipulated by the buttons on the toolbar described above.
The Menu Item field
The controls in this area describe the currently-selected item.
Item name: a symbol (using a keyword is recommended) which provides a programmatic handle for the item.
Title: a string (quotation marks are assumed and should not be entered) which will be displayed as the title of the item, on the menu bar or as an element of a menu. A tilde (~) preceding a character will cause the character to be underlined (the tilde will not be displayed). Pressing Alt plus that character is equivalent to selecting the menu item.
Value: active only for items that are not menus (i.e. leaves of the outline). The value can be any Lisp object. It is not seen by users but is programmatically available when handling menu selections by users. (The value of a menu is the menu object. This is displayed but cannot be changed when the currently-selected item is a menu.)
On click: active only for menus. The function that is called when an item from the menu is chosen. This function is called with the arguments the menu, the chosen menu item, and the window containing the menu bar. The default, funcall-menu-item-with-window applies the menu-item value (which presumably names a function) to the window. Another predefined function is funcall-menu-item (with arguments menu, menu-item, and stream).
Help string: a string which will be (or can be) displayed in the status bar when an item is selected (i.e. the mouse is over it but not yet clicked).
Unavailable: if checked, this item will be grayed out in the menu and choosing it has no effect.
Selected: if checked, a check mark appears in the menu next the title. Any number of items can be selected. The check mark is designed to convey information, it has no other programmatic effect.
The Synonym field
This area only applies to items which are not menus. A synonym is a key or a combination of a key and one or more modifiers. Entering this combination (when the window has focus) is equivalent to choosing the associated menu item. Specify a synonym by choosing a key from the drop-down list and checking as many modifiers as desired.
The default menus
The default menu-bar that gets attached by the inspector to a form calls four sample functions from its File menu. These functions are exported, but are not available at runtime since a real application would want to implement its own custom version of these functions. The sources are given in the Help page for these default functions, to assist developers in writing their own functions.
(Note that the default Edit menu items for cutting and pasting are useful as is at runtime and so are available in runtime.)
The functions are:
Common Graphics and IDE documentation is described in About Common Graphics and IDE documentation in cgide.htm.
The documentation is described in introduction.htm and the index is in index.htm.
Copyright (c) 1998-2000, Franz Inc. Berkeley, CA., USA. All rights reserved.
Created 2000.10.5.