Menus
$Revision: 1.1.1.1.8.3 $
Basics
Menu Editor
Toolbar
Menu Item Group
Writing Code for Menus
Invoking Commands
Opening Menus
Highlighting Commands
Menu Classes
Creating and Modifying Menus at Run
Time
Menu Tutorial
Adding a Menu Bar
Implementing Menu Commands
Customizing Showing Menus
On-click Event Handler
Checking Menu Items
Displaying Pop-Up Menus
Shortcut Menu Tutorial
Shortcut Menu
Popup Menu
Basics
| Menus provide a set of commands for your application's users. The menu bar is located
below the title bar of your window. Note:
Only top-level windows can have a menu bar. A top-level window is a window that is owned
by the screen or another top-level window and is not a child window.
You can add a set of menus to your menu bar. In this case there are two: File
and Edit. Each menu can have zero or more menu-items. For the File
menu, there are 6 menu items. The horizontal line is a special type of menu-item called a
separator. The menus of a menu bar are of type pull-down-menu because as you click on the
title of the menu its menu items are displayed. |
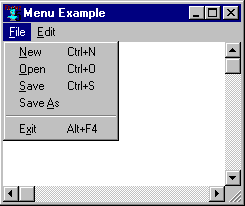 |
In the title of a menu or menu item, you can define an access key. An access
key lets your user open the menu or access the menu item using the keyboard. If you wanted
to open the File menu, you would press ALT+F. To invoke the Exit
menu item, you would press "x". Within a particular menu, you should have each
access key be unique and mnemonic as possible.
Shortcut keys are another way for your users to access your menu commands. A shortcut
key runs a menu item immediately when pressed. You should assign shortcut keys to
frequently used commands. Windows reserves some shortcut keys for cross-application
commands like Cut, Copy and Paste.
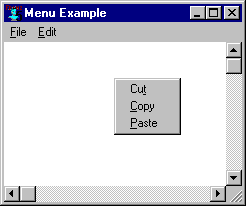
| You may occasionally want a floating menu of commands presented to your
user. The most common implementation of floating (pop-up) menus is shortcut menus.
Shortcut menus are usually displayed after a right mouse click, and often provide
context-sensitive commands. In general, all commands that are displayed on a shortcut menu
should be available through other means in your user interface. In Allegro CL's Integrated
Development Environment, a pop-up menu is displayed when you use the Search |
Complete Symbol command. Floating menus are implemented using pop-up-menus. A
pop-up-menu is similar to a pull-down-menu because it can have one or more menu items. The
difference is that a pop-up menu is not activated by clicking on the menu's title or by
using the ALT key. Usually, pop-up-menus are opened by using the right mouse click |
 |
| The Menu Editor only works with pull-down
menus and cannot be used to define pop-up menus. Pop-up menus must be defined
programmatically. |
Menu Editor
| Add a menu bar to your form by toggling its menu property.
Setting the menu property to a non-nil value causes the default menu bar to be added to
your form and displays the Menu Editor to modify it. As you work in
the Menu Editor, the menu bar displayed on your form is automatically
updated. You can click on Cancel at any time to discard your changes. Everything that you
can do in the Menu Editor, you can also do programmatically and at
run-time.
The Menu Editor is provided as a convenience for specifying your
initial menu bar. |
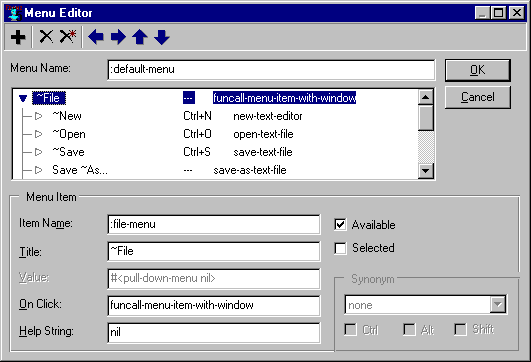 |
| Once you finish specifying the menu bar, use the
OK button to accept your changes. You can use the menu bar on your form
to verify the contents of the menu items. The form's menu bar does not run your code.
Instead clicking on a menu item displays the source code for the value of the menu item.
This is analogous to the event handlers of your controls. In the form, the control does
not execute the code for the event handler. If you want to test the code associated with
your menu bar, then you should run the form. |
The first field in the Menu Editor is the name of the menu bar. You
can use the name of the menu bar to uniquely identify it programmatically. The scrolling
list in the middle of the Menu Editor determines all the menu items on
your menu bar. The Menu Editor gives you a rudimentary starter menu and
adds it to your form. You use the menu bar displayed on your form as a reference. The
indentation in the menu item list reflects the hierarchy of your menu items. Notice that
the File menu item is not indented. Therefore, it appears in your menu bar. The New menu
item is indented under the File menu and appears as a menu item on the File
menu.
Toolbar
The Menu Editor has a toolbar for adding, deleting, and arranging the
menu items.
| Insert |
The Insert button adds a menu item after the
selected menu item. If you want to add a menu item as the first in the menu bar, then you
would select the first menu item and click on the Insert button. Then, you would need to
click on the Move Up (up arrow) button to move it to the start of the menu bar. |
| Delete |
The Delete button deletes the selected menu item
and all of its sub-items. If the File menu item is selected when the
Delete Item button is pressed, then the File menu item will be deleted as
well as the New menu item, Open menu item, etc. |
| Delete All |
The Delete All button removes all of the menu
items in the menu bar. It is possible to have a menu bar with no menu items. |
| Arrow Buttons |
The arrow buttons let you reorder the selected
menu item and reposition the menu item in the hierarchy. You can use the Indent and
Unindent buttons to define cascading menus. |
Menu Item Group
The Menu Item group is updated as a menu item in the list is selected.
| Item Name |
The name of a menu item can be used programmatically to find the menu item. For the
New menu item, its name is :new-text-editor. |
| Title |
The title of the menu item is a string. The naming conventions are that
words should be capitalized, and the title should be as concise as possible. You can
indicate the access key of the menu item by placing "~" before the desired
access-letter in the title. For the New menu item, its access key is "N". For
menu items that need further input to complete, their titles should end in
"...". For example, Edit | Find needs to get to the search
string before it can be executed. Therefore, its title is "~Find...". Make sure
that all the access keys within a menu are unique. You can re-use access keys across
menus.
As a special case, you can define separators by specifying "-" as the title
of the menu item. Menu items that are separators are drawn as a horizontal line across the
width of the menu. When you are working programmatically, there is a menu-separator
variable that you can use rather than creating new menu items every time. The user cannot
click a separator menu item. Separators are used as visual cues to grouped (related)
menu-items. |
| On Click |
You can specify an on-click event handler only if the menu item has
sub-items. Otherwise, the on-click event handler is not valid. The on-click event handler
of a menu is the function that is called when one of its sub-items is clicked on. Using
the File menu as an example, its on-click event-handler is funcall-menu-item-with-window, which is the
default on-click event handler. If the user clicks on the New menu item,
then the on-click event handler of the File menu is executed with the New
menu item passed as an argument. When the user clicks on the New menu item, the
funcall-menu-item-with-window function receives the File menu, the New
menu item, and the current window as arguments. Then, funcall-menu-item-with-window uses
the value of the New menu item as a function and calls it with the current window or the
frame-child of the current window if it has one. The value of the New menu item is
new-text-editor. So, the function, new-text-editor, would be called with the current
window or its frame-child. |
| Value |
You can specify the value of a menu item when it does not have sub-items.
Otherwise, the value of the menu item is the menu containing its sub-items. Therefore, the
value of the File menu item is an instance of menu named :file-menu. When
a menu item does not have sub-items, then the value of a menu item can be anything.
Usually, the value of a menu item is the symbol name of a function to invoke when the menu
item is clicked on. In many applications, there is a Window menu with a list of all the
open windows. For this case, you may decide that the value of the menu item is the window.
Then, you would need to define a different on-click event handler for the Window menu,
which would retrieve the value of the selected menu item and call select-window on that
value. |
| Synonym |
There are four fields associated with the synonym. The synonym fields let
you specify the shortcut key of your menu item. The synonym drop down list lets you pick
the letter, number or function key of the shortcut key. You can check or uncheck the CTRL,
ALT, and SHIFT boxes depending on whether or not you want those modifier keys pressed to
execute this menu item. Make sure that all your shortcut keys are unique for the entire
menu bar. Otherwise, it is arbitrary which command will be invoked when the user presses
the shortcut key combination. |
| Available |
By default, a menu item is available. Available menu items can be clicked
on by the user. Unavailable menu items are displayed as dimmed and cannot be clicked on by
your user. |
| Selected |
By default, a menu item is not selected. Selected menu items are displayed
with a check mark before the title. Selected menu items indicate to your user that
something is "on" or displayed. The View | Status Bar command
in the Integrated Development Environment is an example of a menu item that toggles its
selected state. |
| Help String |
This is the string that is displayed when the user points to a menu item
before clicking on it. By default, the help string of the selected menu item is displayed
in the status bar of your window. |
Writing
Code for Menus
There are three possible actions for associating code with your menus.
- You can add code whenever a menu command is invoked.
- You can add code whenever a menu is opened.
- You can add code whenever a menu item is highlighted.
Invoking Commands
The most common requirement is linking code to when the user invokes a menu command.
There are several different ways that the user can invoke a menu command.
- The user can point to a menu and click on one of its commands, i.e. File | New.
- The user can use shortcut keys to invoke a menu command. For example, CTRL+N invokes the
File | New command.
- The user can click on a command from a shortcut menu.
Whatever way that the user invokes a menu command, all the code funnels through handle-menu-on-click. The arguments to handle-menu-selection are the menu, menu item or its
id, and the current window. If you want to customize the behavior of all menu commands,
then you could subclass menu and add a
method to handle-menu-selection for your
class of menus.
handle-menu-selection does the
following steps.
- If a menu item id was passed, then the corresponding menu item is determined.
- If the value of the menu item is a menu, then pop-up-menu is called on the value with
the current window.
- Otherwise, the on-click event handler of the menu is called with the menu, selected menu
item, and current window.
The on-click event handler of a menu is invoked whenever the user invokes one of its
commands by clicking, shortcut keys, etc. You can specify the on-click event handler of a
menu to be any function that you want. The default on-click event is funcall-menu-item-with-window.
funcall-menu-item-with-window has
arguments of the menu, selected menu item, and current window. You can specialize the
behavior of this function by adding a method specialized for your class of menus.
Typically, you can use the supplied behavior and specify values for the menu items
corresponding to your functions. funcall-menu-item-with-window
does the following steps.
- Gets the value of the selected menu item.
- Does a funcall with the value of the selected menu passing the current window or the
pane of the current window if it has a pane.
Opening Menus
When the user points at a menu on your menu-bar, the menu is opened. Also when the user
does a right click, a shortcut menu may be opened. You can add code to specialize the
behavior of opening a menu.
One example of specialized open behavior is the Edit menu in the
Integrated Development Environment. Before the Edit menu is opened, you
should determine if anything is on the clipboard to paste. That way, you can make the
Paste menu item unavailable before the user sees the menu.
about-to-show-menu is called whenever
a menu is opened. The arguments to about-to-show-menu
are the current window and the menu to open. You can add methods specialized on your
window and/or menu classes depending on your requirements. The default behavior does
nothing.
Highlighting Commands
The user can point to menu items in a menu before clicking. As the user scans through
commands, you can provide help messages and other information to the user to help them
make their choice. You can add code to specialize the menu item selected behavior. The
function, menu-item-highlighted, is called whenever a menu command is highlighted. You can
add methods specialized on your window and/or menu classes depending on your requirements.
The default behavior displays the help string of the selected menu item in the status bar
of the current window.
Menu Classes
| There are several classes related to menus. The following is
a class diagram showing all the menu classes. Notice that all menus inherit from
window. Window is a very primitive window class that provides a handle to an OS window
object. When you are working with windows related to forms, you use a subclass of
basic-pane.
The menu-item class is not shown because it does not inherit from menu because
menu-items are not an OS visible object. Instead, menu-items inherit from standard-object. |
 |
| There are several different functions related to
creating an instance of a menu; the table shows which function should be used for each
menu class. |
| Menu Class |
Creation Function |
| menu-item |
make-instance |
| menu-bar |
make-window |
| pop-up-menu |
open-menu |
| pull-down-menu |
open-menu |
| shortcut-menu |
open-menu |
|
Creating and Modifying Menus at Run Time
Code similar to the following is generated if you accept the default menu bar that is
created when you open the Menu Editor. It provides the provides the value
of the menu keyword argument to make-window. If you want to see
the code for yourself, then toggle the menu property on a form without a menu bar to on. In the Menu Editor, click on OK
to accept the default menu bar. With the focus on the form, save it using the File
| Save command. In the editor, open the .bil file and search for
open-menu.
(open-menu
 (list (make-instance 'menu-item
         :name :file-menu
         :title "~File"
         :value
         (open-menu
          (list (make-instance 'menu-item
                  :name 'new-text-editor
                  :title "~New"
                  :value 'new-text-editor
                  :selected nil
                  :available t
                  :event-synonym '(control-key #\N)
                  :help-string "New editor")
                (make-instance 'menu-item
                  :name 'open-text-file
                  :title "~Open"
                  :value 'open-text-file
                  :selected nil
                  :available t
                  :event-synonym '(control-key #\O)
                  :help-string "Open a file")
                (make-instance 'menu-item
                  :name :save
                  :title "~Save"
                  :value 'save-text-file
                  :selected nil
                  :available t
                  :event-synonym '(control-key #\S)
                  :help-string "Save to file")
                (make-instance 'menu-item
                  :name 'save-as-text-file
                  :title "Save ~As..."
                  :value 'save-as-text-file
                  :selected nil
                  :available t
                  :event-synonym nil
                  :help-string "Save to new file")
                (make-instance 'menu-item
                  :name nil
                  :title "-"
                  :value nil
                  :selected nil
                  :available nil
                  :event-synonym nil
                  :help-string nil)
                (make-instance 'menu-item
                  :name 'user-close
                  :title "E~xit"
                  :value 'user-close
                  :selected nil
                  :available t
                  :event-synonym '(alt-key vk-f4)
                  :help-string "Exit application"))
          'pull-down-menu (screen *system*)
          :name :file-menu
          :on-click 'funcall-menu-item-with-window)
         :selected nil
         :available t
         :event-synonym nil
         :help-string nil)
       (make-instance 'menu-item
         :name :edit-menu
         :title "~Edit"
         :value
         (open-menu
          (list (make-instance 'menu-item
                  :name 'cut-command
                  :title "~Cut"
                  :value 'cut-command
                  :selected nil
                  :available t
                  :event-synonym '(control-key #\X)
                  :help-string
                  "Copy contents to clipboard and delete")
                (make-instance 'menu-item
                  :name 'copy-command
                  :title "C~opy"
                  :value 'copy-command
                  :selected nil
                  :available t
                  :event-synonym '(control-key #\C)
                  :help-string
                  "Copy contents to clipboard")
                (make-instance 'menu-item
                  :name 'paste-command
                  :title "~Paste"
                  :value 'paste-command
                  :selected nil
                  :available t
                  :event-synonym '(control-key #\V)
                  :help-string
                  "Paste contents from clipboard"))
          'pull-down-menu (screen *system*)
          :name :edit-menu
          :on-click 'funcall-menu-item-with-window)
         :selected nil
         :available t
         :event-synonym nil
         :help-string nil))
 'menu-bar (screen *system*)
 :name :default-menu
 :on-click 'funcall-menu-item)
open-menu
(open-menu (list ...) 'pull-down-menu (screen *system*)
                      :on-click 'funcall-menu-item-with-window ...)
Use the open-menu function to create a pop-up-menu or pull-down-menu.
The arguments to open-menu are the list of menu-items, the type of menu,
the screen, and zero or more keyword arguments for the properties of the menu.
| name |
The symbolic name of the menu item |
| title |
The title of the command. Place a "~" before the
access key of the command.
Use "-" to indicate a menu separator. |
| on-click |
The event handler that is invoked when the user clicks on a
menu item in the menu |
make-instance
(make-instance
'menu-item :name :new :title "~New" ...)
For every command on a menu, you need to create an instance of menu-item.
In general, you need to specify most of the properties of a menu-item
to have it perform properly.
| allow-during-modality |
A Boolean value indicating whether or not the command can be
invoked when a modal dialog is displayed |
| available |
A Boolean value indicating whether the command is displayed
as available or dimmed |
| event-synonym |
The shortcut key(s) that can invoke the command. Values can
be nil or a list of key constants/characters. Here are two
examples, '(vk-f8) and '(control-key
#\N). |
| help-string |
A string that is displayed when the user points to the menu
item |
| name |
The symbolic name of the menu item |
| selected |
A Boolean value indicating whether or not the menu item is
displayed with a check mark or not. |
| title |
The title of the command. Place a "~" before the
access key of the command. Use "-" to indicate a menu separator. |
| value |
The value of the menu item. If the menu item has sub-items,
then the value is a pull-down or pop-up menu. |
(make-instance
'menu-item :name nil :title "-")
Creates a menu separator. When the title of a menu-item is "-", then a
menu separator is displayed as a horizontal line in the menu. You can also use the
constant, menu-separator, instead of creating a menu-item. Menu items can be placed on
more than one menu.
Menu Tutorial
This short tutorial demonstrates creating and customizing an application's menu bar.
The sample application is a mini-text editor that extends the default menu bar.
Setup
- Open a new project using File | New Project.
- Inspect the new form by double-clicking on it.
- In the form inspector, change its name to :menu-example, title to "Menu
Example", and status-bar to t.
- View the Project Manager using View | Project Manager.
- In the Project Manager, change the name of the project to :menu-example
by clicking on the Options tab and entering :menu-example for the name. Press the tab key
and notice that the title in the top Project window (the Allegro CL window with the menus
and component toolbar) changes to "Menu-example".
- Because you are creating a new text application, you will need to have your own window
class with its unique behavior. Later, it will be necessary to add methods customized on
your window class. The class property of a form determines the type of running window that
is created. Before you can change the device to your window's class, you have to define a
new window class.
- In the Project Manager, view the source code for the menu-example form.
You do this by clicking on the General tab and selecting the menu-example module and press
the View Selected Code button (the second one with binoculars in the icon).
- In the menu-example editor, add the following class definition. Since we want our
application to behave as a text editor we inherit from text-edit-window. In future steps,
we will customize methods on our new window class.
(defclass my-window (text-edit-window)
    ())
- The text-edit-window class is derived
from frame-with-single-child. Therefore,
creating an instance of my-window also creates an instance of a pane. For some of the
commands, it is necessary to add methods specialized on the pane of my-window. Therefore, you need to specify a
custom pane class for my-window. In the menu-example editor, add the
following class and method definitions.
(defclass my-pane (text-edit-pane)
    ())

(defmethod default-pane-class ((window my-window))
    'my-pane)
- You need to compile the new window class so that it is known. Because you have added
several new definitions, it is easier to let the Project Manager do the
compiling for you. First, save all your changes by clicking on File | Save All.
Save the files to a convenient empty directory.
- Then, compile the project using Tools | Compile Project.
- In the form inspector, change the class to my-window. Whenever you run the form, an
instance of my-window is created.
- Save your changes using File | Save All.
Adding a Menu Bar
- Add a menu bar to your form. In the form inspector, select the menu
property and click on the extended editor button (the one with three dots). Notice that
the Menu Editor is displayed and the default menu bar is added to your
form.
- In the Menu Editor, click on the File menu item.
Notice that it has an on-click function
named funcall-menu-item-with-window. This
is the default on-click function for
menus and applicable for most cases. Later in this tutorial we will show you how to use a
different on-click
function.
- In the Menu Editor, click on the File | New menu item.
Notice that it has a value, which is a function name, and that it does not have an on-click function. Also, notice that there is a
help string assigned to the menu item. In the next step, we will display this help string
in the status bar of our form.
- Accept the default menu bar by clicking on the OK button in the Menu
Editor. Notice that the menu bar remains on your form and that you can preview
the menu by selecting menu items.
- Run your project and try the menu bar using Run | Run Project. Try
selecting menu items and notice the help strings displayed in the status bar. Try
selecting commands on the File and Edit menus. In future
steps, we will customize the behavior so that your text editor behaves better. When you
are satisfied, stop the project using Run | Stop.
Implementing Menu Commands
- In the previous step, you may have tried the File | New and File
| Open commands. By default, these commands created new editor windows similar to
a multi-document interface (MDI) style. For our simple example, we want a single document
interface (SDI) style similar to Notepad's behavior. In Notepad, you can only edit a
single file at a time.
- First, let's fix the behavior of the File | New command. When File
| New command is selected, the function, new-text-editor
is called. You can determine what function is called by using the Menu Editor.
Inspect the menu-example form. In the
inspector, select the menu property and click on the extended editor button. In the Menu
Editor, select the File | New menu item. Notice that its value
is new-text-editor.
Click Cancel on the Menu Editor when satisfied.
- To add the new method for new-text-editor,
display the source code for the menu-example form. View
the Project Manager using View | Project Manager. In the
project manager, select the menu-example module on the General tab and press the View
Selected Code button.
- In the menu-example editor, add the following method. Notice that this
method needs to be specialized on the pane rather than the window. This is because funcall-menu-item-with-window automatically
calls the menu-item's value on the pane if one exists. This method uses an internal
common-graphics function for convenience.
(defmethod new-text-editor ((window my-pane))
   (setf (file window) nil)
   (clear-page window))
- Next, let's customize the behavior of the File | Open command. File
| Open calls the function open-text-file.
In the menu-example editor, add another method specialized on the pane.
Again, internal common-graphics functions are used for convenience.
(defmethod open-text-file ((window my-pane))
   (let* ((pathname
            (ask-user-for-existing-pathname "Edit File"
             :stream window)))
      (cond ((or (null pathname) (not (probe-file pathname))) nil)
            (t
              (load-file window pathname)))))
- Save all your changes using the File | Save All. Try running your
application and using the File | New and Open commands.
Notice the new SDI behavior. You can try opening an existing file and making changes. The File
| Save and Save As commands do not actually save your changes.
That is the next step. When you are satisfied, stop the application using the Run
| Stop command.
- To complete the File menu, you need to fix the File | Save
and File | Save As commands. In the menu-example editor,
add the following methods. Common-graphics functions are used again, for convenience.
(defmethod save-text-file ((window my-pane))
   (save-file window (file (parent window))))

(defmethod save-as-text-file ((window my-pane))
   (save-file window nil))
- Save all your changes using File | Save All. Try running your
application using the Tools | Run Project command. In the running window,
try using the File commands. Notice that the Edit menu works but it would be nice to
invalidate the Edit | Cut and Copy command when there is
no selected text. When you are satisfied, stop the application using the Run |
Stop.
Customizing Showing Menus
- In the previous step, you noticed that the Edit | Cut and Copy
commands were available even if nothing was selected. For this section, we will customize
the about-to-show-menu behavior for our
window to provide better user feedback.
- In the menu-example editor, add the following method to about-to-show-menu.
Notice that this method needs to specialize on the window rather than its pane. This about-to-show-menu method makes the Edit
| Cut and Copy commands unavailable if there is no selected
text. Also, the Edit | Paste command is made unavailable if nothing is on
the clipboard. For all other menus, the default behavior is invoked by using call-next-method.
(defmethod about-to-show-menu ((window my-window) menu)
   (case (name menu)
     (:edit-menu
       (multiple-value-bind (start end)
           (get-selection (frame-child window))
          (setf (available (find-named-object 'cut-command menu))
                (not (eq start end)))
          (setf (available (find-named-object 'copy-command menu))
                (not (eq start end)))
          (setf (available (find-named-object 'paste-command menu))
                (first (first (clipboard *system*))))))
     (t
       (call-next-method))))
- Save all your changes using File | Save All. Try running your
application using Tools | Run Project. In the running window, try using
the Edit commands with and without selected text. When you are satisfied,
stop the application using Run | Stop.
On-Click Event Handler
- Up to this point, you have not needed to define an on-click event handler for your
menus. You have been using the default on-click event handler, which is funcall-menu-item-with-window. We will extend
our mini-text editor to allow users to select a different background color from a menu.
For our example, we will allow the user to choose between system specified, red, green and
blue. The background color menu will display a list of color names that the user can
select.
- First, you need to add a Background menu to your menu bar. Inspect the menu-example
form. In the form inspector, select the menu property and click on the extended editor
button. In the Menu Editor, scroll down and select the Edit menu item.
With the Edit item selected, press the Insert Item button. Scroll down and notice that an
Untitled menu has been added to the list and to the menu bar displayed on your form.
- In the Menu Editor, make sure that the new Untitled menu item is
selected. Change its name to :background-menu and title to "~Background".
- Let's add the system specified menu item to the Background menu. In the Menu
Editor, make sure that Background menu is selected and press the Insert Item
button. Select the new Untitled menu item and press the Indent button (right-pointing
arrow). Change the name of the menu item to :system and title to "~System". The
value of the menu is deliberately left nil because a background-color of nil means use the
system-specified color.
- Let's add a red background menu item. In the Menu Editor, select the
System menu item and press the Insert Item button. Select the Untitled menu item and
change its name to :red, title to "~Red" and value to red. The symbol, red, is
bound to an rgb constant for red. Later, we will use the value of the menu item to specify
the background color of the pane.
- Repeat the previous step for Blue and Green menu items. Set their values to blue and
green, respectively. At this point, your background menu should have four items, System,
Red, Green and Blue.
- Stylistically, it is better to have System separated from the other menu items because
it behaves a little differently. In the Menu Editor, select the Background
| System menu item and press the Insert Item button. Select the Untitled menu
item and change the title to "-". Setting the title to "-" is a
special case that creates a menu separator for you.
- Finally, you should change the on-click event handler for the Background menu to
background-color-on-click (which we define in 40 below). You cannot use the default
on-click event handler because it tries to call the value of the menu item as a function.
For this menu, the values of the menu items are the color for the background of the
editor.
- Save your menu bar by clicking on the OK button in the Menu
Editor.
- Next, you add a background-color-on-click function. View the Project Manager
using View | Project Manager. In the Project Manager,
select the General tab, select the menu-example module, and press the View Selected Code
button.
- In the menu-example editor, add the following method. This method is invoked whenever
the user clicks on a menu item in the Background menu. Notice that you have to change the
background color of the frame-child (pane) rather than the editor window.
(defmethod background-color-on-click (menu menu-item (window my-window))
   (declare (ignore menu))
   (setf (background-color (frame-child window)) (value menu-item)))
- Save all your changes using File | Save All. Try running your
application using Tools | Run Project. In the running window, try
selecting different Background colors. Notice that the Background menu works but it would
be nice to indicate what the current background color is by a check mark. When you are
satisfied, stop the application using Run | Stop.
Checking Menu Items
- In the previous section, you noticed that it would be nice to check the current
background color when the Background menu is displayed. This is very similar to setting
the availability of the Edit menu commands before the Edit menu is shown. In fact, you
need to extend the about-to-show-menu method for your window.
- Edit the about-to-show-menu method for my-window. View the Project Manager
using View | Project Manager. In the Project Manager,
select the General tab, select the menu-example module, and press the View Selected Code
button.
- In the menu-example editor, change the about-to-show-menu
method to match the following. The selected property of a menu item indicates whether or
not it is checked. There is a check for the menu separator item so that it will not appear
checked and the system item is checked if the background color is nil.
(defmethod about-to-show-menu ((window my-window) menu)
   (case (name menu)
     (:edit-menu
       (multiple-value-bind (start end)
           (get-selection (frame-child window))
          (setf (available (find-named-object 'cut-command menu))
                (not (equalp start end)))
          (setf (available (find-named-object 'copy-command menu))
                (not (equalp start end)))
          (setf (available (find-named-object 'paste-command menu))
                (first (first (clipboard *system*))))))
     (:background-menu
       (let ((color (background-color (frame-child window))))
            (dolist (item (menu-items menu))
               (setf (selected item)
                     (and (null (string-equal (title item) "-"))
                          (or (and (null color) (null (value item)))
                              (if (and color (value item))
                                 (rgb-equal (symbol-value (value item))
                                            color))))))))
     (t
       (call-next-method))))
- Save all your changes using File | Save All. Try running your
application using Tools | Run Project. In the running window, try
selecting different Background colors. Notice that the Background menu checks the current
background color. When you are satisfied, stop the application using Run | Stop.
Floating menus are implemented using pop-up-menus. A pop-up-menu is similar to a
pull-down-menu because it can have one or more menu items. The difference is that a pop-up
menu is not activated by clicking on the menu's title or by using the ALT key. Usually,
pop-up-menus are opened by using the right mouse click. You cannot use the Menu
Editor to specify pop-up-menus.
Pop-up menus that are opened using a mouse right click are called shortcut menus. If
you want to define a shortcut menu for your window, you do the following:
- Define your own window class that inherits from one of Common Graphics window classes
like dialog.
- Optionally, define your own shortcut menu class that inherits from shortcut-menu. Add a shortcut-menu-class method specialized on your
window that returns the name of your shortcut menu class.
- Add a mouse-right-down method
specialized on your window that calls pop-up-shortcut-menu.
- Add a shortcut-commands method
specialized on your window and on your shortcut menu class that returns a list of menu
items for the shortcut menu.
There is a more general exported function called pop-up-menu. If you use pop-up-menu,
you are responsible for opening the menu, creating the menu items, and positioning the
pop-up menu.
The utility function called pop-up-lettered-menu
takes a list of strings and displays a pop-up-menu
with alphabetized accelerator keys. If the user clicks on an option, then the string of
the selected item is returned. Otherwise, nil is returned
if no item is selected. pop-up-lettered-menu
enables an end user to type a single key to select an item. It is used by the Search
| Complete Symbol command in the Integrated Development Environment.
Shortcut Menu Tutorial
The following steps extend the previous mini-text editor example. For shortcut menus,
you cannot use the Menu Editor and will have to work programmatically.
Shortcut Menu
- Open the menu-example project using File | Open Project.
- First, let's define a new shortcut-menu class and that is associated with my-window.
View the Project Manager using View | Project Manager.
In the Project Manager, select the General tab, select the menu-example
module, and press the View Selected Code button.
- In the menu-example editor, add the class definition for your shortcut-menu.
(defclass my-shortcut-menu (shortcut-menu)
    ())
- Next, you need to associate your new shortcut-menu class with your pane class. You need
to specialize for your pane rather than the window because the user will be clicking
inside the pane not the window. Therefore, you need to add a shortcut-menu-class method
specialized for my-pane to return my-shortcut-menu.
(defmethod shortcut-menu-class ((window my-pane))
   'my-shortcut-menu)
- Whenever the user presses the mouse right button, you want your shortcut menu to appear.
By default, nothing happens when the user clicks the mouse right button in your window.
Therefore, you need to add a mouse-right-down event method.
(defmethod mouse-right-down ((window my-pane) buttons data)
   (declare (ignore buttons data))
   (pop-up-shortcut-menu window))
- Finally, you must specify what commands you want on your shortcut menu. For this case,
we have inspect and changing the background color.
(defmethod shortcut-commands ((window my-pane) (menu my-shortcut-menu))
   (list (make-instance 'menu-item
           :name :inspect
           :value 'inspect-command
           :title "Inspect")
     menu-separator
     (make-instance 'menu-item
       :name :system-background
       :value 'system-background-color-command
       :title "System Background"
       :selected (not (background-color window)))
     (make-instance 'menu-item
       :name :blue-background
       :value 'blue-background-color-command
       :title "Blue Background"
       :selected (rgb-equal (background-color window) blue))))

(defmethod inspect-command ((window my-pane))
   (inspect window))

(defmethod system-background-color-command ((window my-pane))
   (setf (background-color window) nil))

(defmethod blue-background-color-command ((window my-pane))
   (setf (background-color window) blue))
- Save all your changes using File | Save All. Try running your
application using Tools | Run Project. In the running window, try
clicking the mouse right button in the editor pane. When you are satisfied, stop the
application using Run | Stop.
Popup Menu
Sometimes you may want to use the more general pop-up-menu
function rather than pop-up-shortcut-menu.
- Display the menu-example editor. View the Project Manager
using the View | Project Manager command.
- In the Project Manager, select the General tab, select the menu-example
module and press the View Selected Code button.
In the menu-example editor, you would need to rewrite the mouse-right-down function to use pop-up-menu instead. Since you are not using
the shortcut menu functions, you are responsible for creating the menu and its menu items.
The pop-up-menu function displays a
pop-up menu at a specified location.
;; Redefined mouse-right-down that calls pop-up-menu.
(defmethod mouse-right-down ((window my-pane) buttons data)
  (declare (ignore buttons data))
  (let ((menu (open-menu
	       (list (make-instance 'menu-item
		       :name :inspect
		       :value 'inspect-command
		       :title "Inspect")
		     menu-separator
		     (make-instance 'menu-item
		       :name :system-background
		       :value 'system-background-color-command
		       :title "System Specified Background"
		       :selected (not (background-color window)))
		     (make-instance 'menu-item
		       :name :blue-background
		       :value 'blue-background-color-command
		       :title "Blue Background"
		       :selected (rgb-equal (background-color window) blue)))
	       'my-shortcut-menu (screen *system*)
	       :window window)))
    (prog1 (pop-up-menu menu (screen *system*))
      (close menu))))
- Save all your changes using File | Save All. Try running your
application using Tools | Run Project. In the running window, try
clicking the mouse right button in the editor's pane. When you are satisfied, stop the
application with Run | Stop.
Copyright (C) 1998-1999, Franz Inc., Berkeley, CA. All Rights Reserved.